MAINTENANCE
To Create Adjustments
Click Maintenance on the navigation bar
From the drop-down menu select Adjustments
 button and the Adjustments main page is displayed.
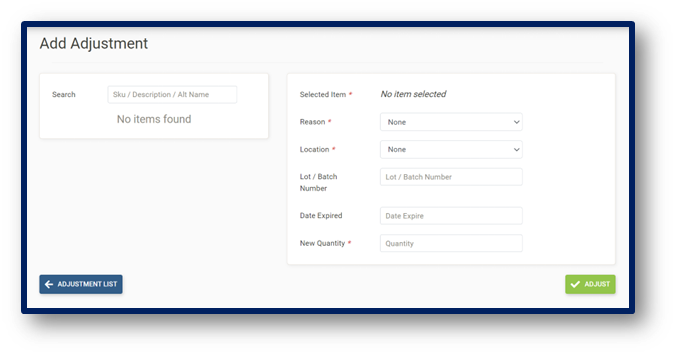
Select Add Adjustment
 button and the Create Adjustment Page is displayed:
Search for items by SKU, by Description or Barcode
Select item
Select Adjustment Reason
Select Location of the item quantity being adjusted
Enter Batch Number (if required)
Enter Date Expired (if required)
Enter New Quantity
Adjust button to process the Adjustment
Adjustment List button to return to Adjustments Main Page
Note: The new quantity box does not calculate i.e. if the quantity of an item is 10, then input 10 into the new quantity box.
To Search Adjustments
To Create, Edit and View Stock Counts
Click Maintenance on the navigation bar
From the drop-down menu select Stock Count
 button and the Stock Count Main Page is displayed:
Select Month
Select Location/Cost Centre
Create Stock Sheet button to create selected locations/cost centers stock counts
Actions button to Select All Stock
Actions button to Invert Selection
Actions button to Select None
Actions button to Export Blank Sheets
Actions button to Export Barcodes Sheets
Select Treat as Month End (if it is the month end stock month)
Click on Stock Count folder created
Apply Shelves
Enter Counts
View Cost Report
Add Missing Items
Apply System Quantity
Update Stock Reports
Settings button to Apply System Quantity
Settings button to Remove Item
Actions button to Import From Spreadsheet
Actions button to Export To Spreadsheet
Save Counts button to update quantities entered
Delete Stock Count button
Stock Count List button to return to the Stock Count Main Page
To Import Daily Revenue
To View Daily Revenue
Click Maintenance on the navigation bar
- Select Daily Revenue
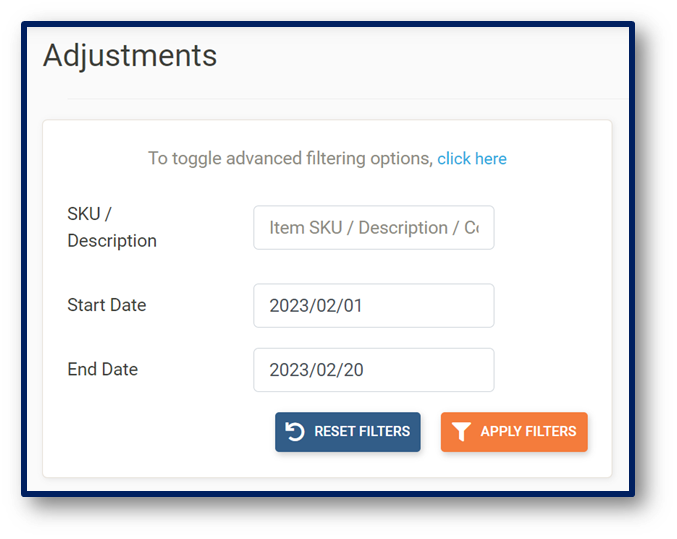
Select Date Range
Apply Filters button to search for items
Reset Filters button to remove all filters
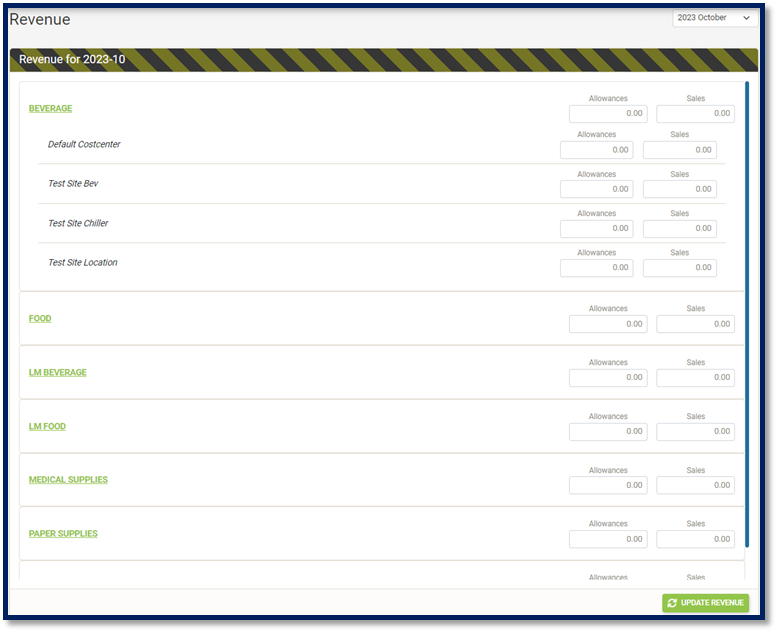
To View Monthly Revenue
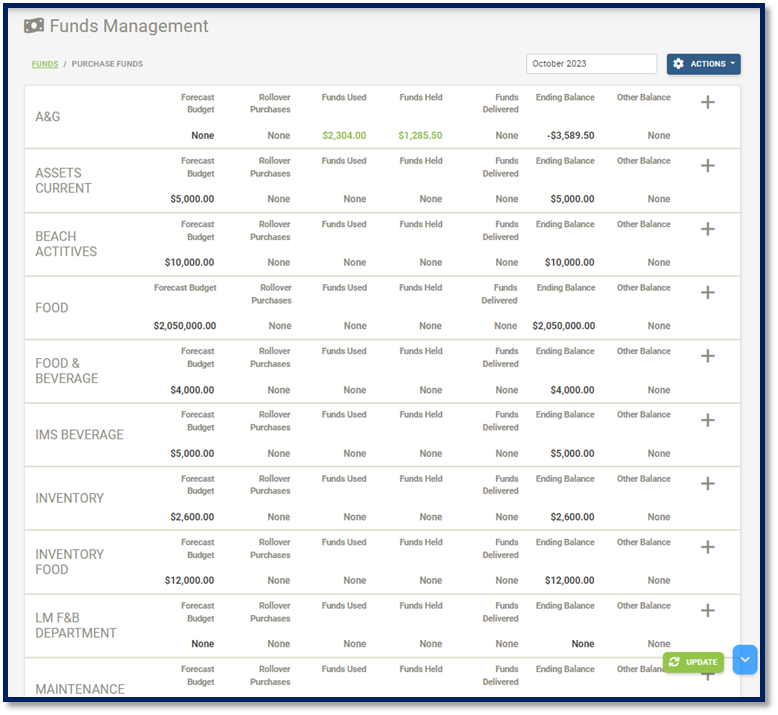
To View Funds Management
Click Maintenance on the navigation bar
- A list of current GL Accounts should be visible with headings showing:
Forecast Budget
Rollover Purchases
Funds Used
Funds Held
Ending Balance
Other Balance
Month/Year drop-down
Actions button to Add Missing Accounts
Actions button to Remove Accounts
Actions button to Refresh page
Actions button to Export Summary
Actions button to Export Details
Actions button to Import
Actions button to Clean
Actions button to Close Month
Update button
To View and Close Month End
Click Maintenance on the navigation bar
From the drop-down menu select Month End
 button and the Month End Main Page is displayed:
Select Month
Update Reports
Close Month
Note: The Close Month button would only be displayed once all Credit Notes, Requisitions, Transfers Out, Transfers In and Stock Count Transactions are closed.
To Create Kit/Recipe Templates
Click Maintenance on the navigation bar
From the drop-down menu select Kit/Recipe Template
 button and the Kit/Recipe Template Page is displayed:
Click the View POS Uploads button to view the POS Upload page

To create a new Kit/Recipe Template, click the Add Kit/Recipe button

Search by Item SKU, Description or Code
Search by Category
Select by Selection type
Apply Filters button to search for items
Reset Filters button to remove all filters
Click the green plus button to add an item to the Cart
Click the red minus button to remove an item from the Cart
Actions button to create new items
On the Kit/Recipe Builder page, additional information is added to the recipe:
Enter a Title
Enter the recipe’s PLU
Select a Menu Type
Select a Location Sold
Select a Modifier Type
Enter Portion amount
Enter Portion selling price
Select item Source locations
Select Optional choice (Yes/No)
Enter Quantity
Enter Yield Percent
Actions button to Add items
Actions button to Remove items
Update button to sace recipe
To Create Pipeline Templates
Click Maintenance on the navigation bar
Click the Add Template
 button to create a new template
Enter a Pipeline Name
Enter a Name for the step
Select a Template (Recipe Template)
Select a Final Location
Select a Waste Location
Enter a Description
Update button to save template
Pipeline List button to return to the Pipeline Template list page
On the Pipeline Template list page, users can search for a Pipeline Template using the filter.
To Upload Point of Sale Uploads
Click Maintenance on the navigation bar
-
To view and search for a Point of Sale Upload:
Note: Imported Sales will also be shown on the Sales list page.
To Search and View Uploaded Documents via Document Library
Click Maintenance on the navigation bar
The Document Library page shows:
Filter by Start Date / End Date
Filter by Document Code
Filter by Document Name
Filter by Document Type
Filter by Uploader
Apply Filters button to search for items
Reset Filters button to remove all filters
Actions button to Export Selected as an Archive
Actions button to Clear Selection
View Document Storage Used
