PURCHASES
To Create Purchase Orders
Click Purchases on the navigation bar
Click the Add Purchases
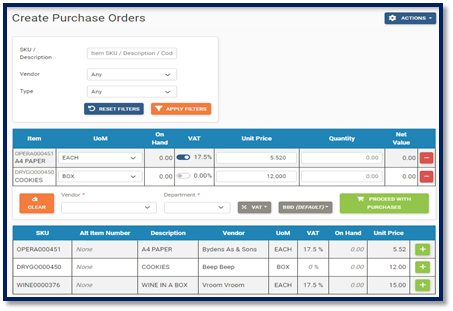
 button and the Create Purchase Order page is displayed:
To Create a Purchase Order:
Search for items by Item SKU, Description or Code
Search for items by Vendor
Search for items by Type
Apply Filters button to search for items
Reset Filters button to remove all filters
Click the green plus button to add an item to the Cart
Click the red minus button to remove an item from the Cart
Add a Quantity
Select a Vendor
Apply V.A.T. to individual items
Change Unit of Measure
Change Unit price
Enter Quantity
Change Currency (if applicable)
Click Clear to remov all items from the Cart
Actions button to create a new item
Note: The **V.A.T*  button can automatically fill all line entries with the V.A.T. amount selected. The Currency
  button is used to change the currency on the current Purchase Order being created.*
Once completed, click the Proceed With Purchases
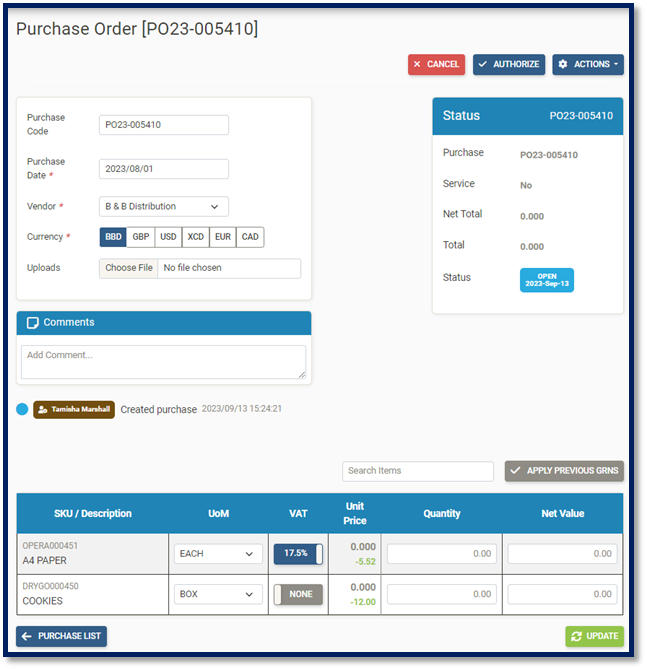
 button and the Edit Purchase Order page is displayed:
Edit Purchase Code (if required)
Enter the Purchase Date
Change the Vendor
Select a Department
Select an option for Overseas Purchase (Yes/No)
Change the Currency Type
Upload a file
Add a Note (private or public)
Add/Remove V.A.T.
Change Order Quantity
Change Net Value (Apply Pervious GRNs)
Update button to save order
Close button to cancel order
Purchase List butto to go back to Purchase List page
Authorize button t authorize purchase order
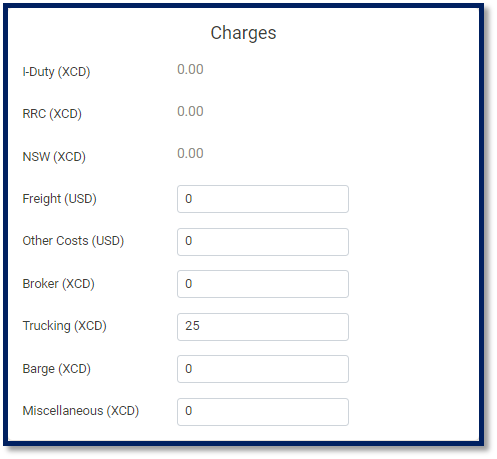
After an overseas purchase order has been authorized, the Charges will be visible
Deauthorize button to deauthorize purchase order (can only be seen after the transaction has been authorized)
Send to Vendor (based on if the vendor has an email)
Marked Delivered
Actions button to Create new items
Actions button to Add items
Actions button to Remove items
Actions button to Copy Items to Purchase Cart
Actions button to Duplicate purchase
Actions button to Export as PDF
Actions button to Export with Departments as PDF
Note: Service Purchase Orders can only be created if the item selected has a service type.
To Receive a Purchase Order
Once the Purchase Order is Authorized, click the Receive Order
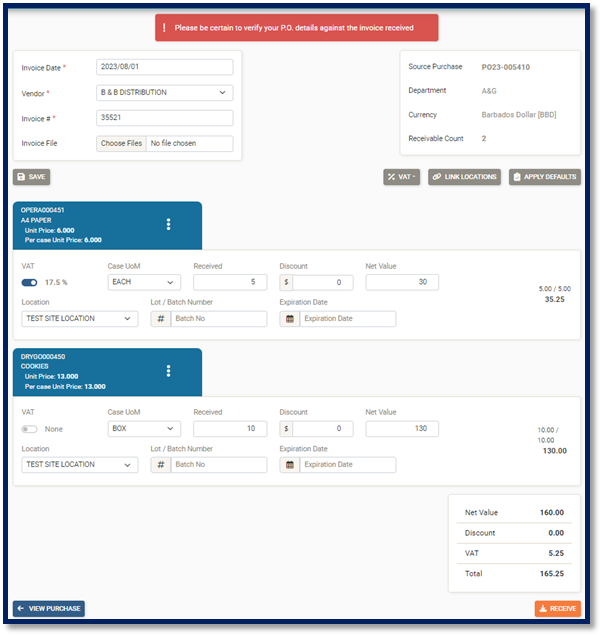
 and the Receive Purchase Order page is displayed:
Select Invoice Date (defaults to the same a Purchase Order)
Select a Vendor (defaults to the same as Purchase Order)
Enter an Invoice Number
Upload a file
On overseas invoices, the Charges will be visible
Select the location where the items are received to
Change V.A.T.
Change Case UoM
Enter the received quantity
Enter discount ($ or %)
Edit Net Value (automatically calculated when the received amount is entered)
Select a location
Enter a Batch Number
Select Expiration Date
Apply defaults(this automatically applies the Default VAT option, Order Quantity, Default Locations and Net Value)
Save button to save the receive note
Receive button to receive the Invoice
Note: The Receive Order button would not be displayed until the Purchase Order is at Authorized status. The V.A.T |Vat_Button.png| and Link Locations |Link_Locations.png| button can automatically fill all line entries with the V.A.T. amount and Location selected. Before receiving, please verify that the Sub-total, Discount, V.A.T. and Grand-Total values match the values on the corresponding invoice.
To Receive an Overseas Purchase Order
Once the Purchase Order is Authorized and Charges are confirmed, click the Receive Order button
 and the Receive Order page is displayed:
Select Invoice Date (defaults to the same as the Purchase Order)
Select a Vendor (defaults tot the same as the Purchase Order)
Enter an Invoice number
Upload a file
Verify Charges
Select the location where the item are received to
Change V.A.T.
Change Case UoM
Enter received quantity
Enter discount ($ or %)
Edit Net Value (automatically calculated when received amount is entered)
Select a location
Enter a Batch number
Select Expiration date
Apply Defaults (this automatically applies the Default V.A.T. option, Order Quantity, Default Locations and Net Value)
Save button to save the receive note
Edit Receive Data button to go back to the receiving page
Receive button to receive the Invoices
To Receive Partial Invoices
Once the Purchase Order has been partially received, view the Purchase Order on the Purchase List. The Purchase Order should be at Receiving status.
Click the magnifying glass to view the Purchase Order.
Select Invoice Date (defaults to the same as the Purchase Order)
If the remainign quantity will not be delivered, click the Process button to close the PO.
If the remaining quantity is delivered, click the receive order button
Enter an invoice number
Click apply defaults and the remaining quantity will show
Receive button to receive the Invoice fully
To Search and View Purchase Orders
Click Purchases on the navigation bar.
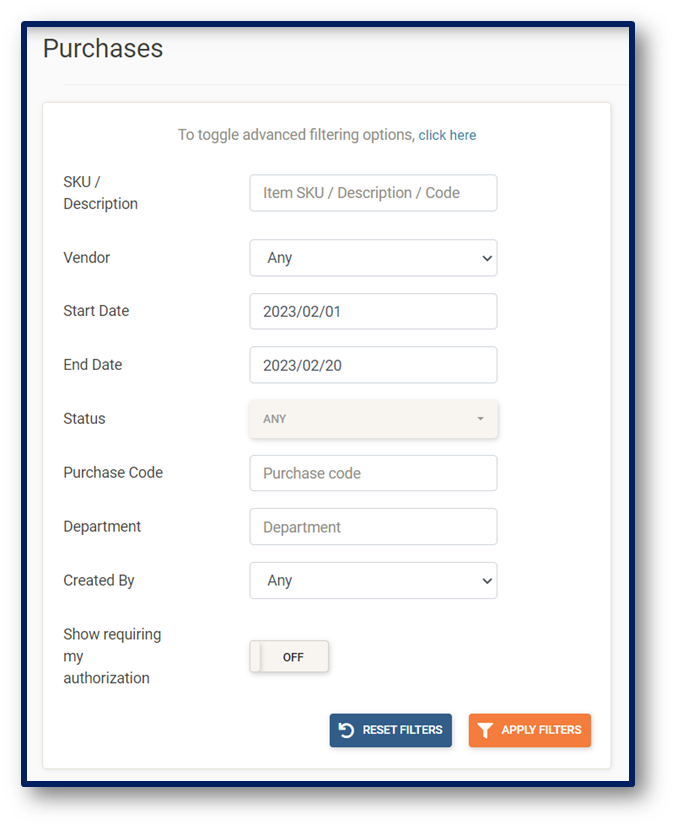
The Purchases main page is displayed:
Search by Item SKU, Description or Code
Search by Vendor
Select Date Range
Search by Status
Search by Purchase Order Code
Search by Department
Search by Created By
Show requiring my authorization
Apply Filters button to search for items
Reset Filter button to remove all filters
Actions button to view/order from the shopping list
Actions button to Request authorization for selected (once at open status)
Actions button to Authorize selected (once at open status)
Actions button to to Export selected as PDF (only seen if a transaction has been clicked/selected)
Actions button to Export (with departments) selected as PDF
Actions button to Clear selection
Click the magnifying glass on a transaction to view it.
